Edit Show
After clicking the button next to a show in your show list you will be presented with the following popup. You'll notice it is very similar to the Add Show interface with a couple small differences:
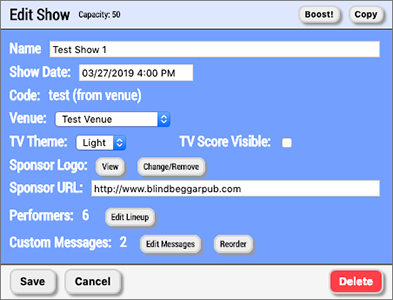
On the Settings tab, these fields control how your show works and what is presented to your audience:
- Name — Identifies the show on your list and appears below your venue logo on mobile devices when showing text slides.
- Doors Open and Show Ends — The window when your show is active. Click each field to open the date and time picker (via react-datetime). The show must end after doors open. Maximum show length is normally 12 hours; if you use Extended Voting, it can be longer (up to 60 days). You cannot schedule a show that overlaps another show in a way the system rejects—if there is a conflict, you will see a warning when saving.
- Code — What audience members enter to join this show on their phones. If you pick a venue that has its own code, the venue's code is used instead (shown on the form). The form warns you if your code is taken for overlapping times.
- Venue (optional) — Tie the show to a venue you created. When selected, the venue's code and sponsor branding can override the show-level code and sponsor fields when those are defined on the venue.
- TV Theme — Light (white background) or Dark (black background) for venue TVs. Dark is easier on the eyes with house lights down.
- TV Score Visible — Shown when Voting or Extended Voting is enabled. When checked, live vote totals for the current performer can appear on TVs during voting.
- Sponsor Logo / Sponsor URL (optional, when your account supports advertising) — Branding at the bottom of audience mobile screens; a venue with sponsor fields set can override these.
- Spotify Playlist URI (optional) — Background music on the TV experience when you configure Spotify for the show.
- Performers — Appears when Performing, Voting, or Extended Voting is enabled. Use Edit Lineup to add and order performers.
- Slides — Appears when Slides (the Slides feature) is enabled. Use Edit Slides to add text, image, or video slides (Hi-Impact permissions required for some media types).
Edit Lineup
If you click the button then you will be taken to the following screen to edit the lineup of performers on your show:
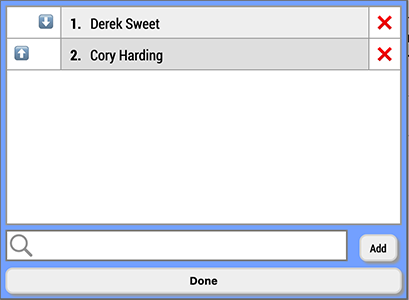
From here you can click the ⬆ and ⬇ buttons to move performers up and down in the lineup, or you can click the ❌ to the right of a performer to remove them from the lineup completely. Type a name into the search bar at the bottom and you will be presented with a list of search results for performers in the Human Input system:
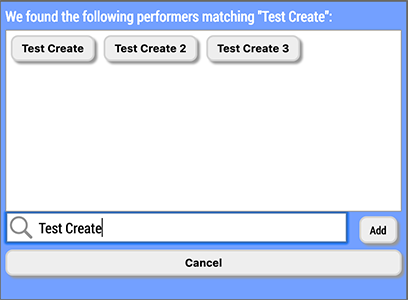
The performer names that match the search you entered will appear as buttons. Click the performer name if they appear and you want to add them to the show. If you don't see the performer you are entering simply click the button to add them to our system. You will be presented with a confirmation screen to make sure the spelling is correct. Click 'OK' and they will be added to our system as well as your lineup.
Edit Messages
If you click the button then you will be taken to the following screen to edit the custom messages on your show:

When you first come to this screen you will have no custom messages. Click the button to add one. There are 4 types of custom messages you can add.

The first type of custom message is Single. This is a flat text input that you can enter a message into, and it will display the same message on both the TVs as well as the audience members' mobile devices.
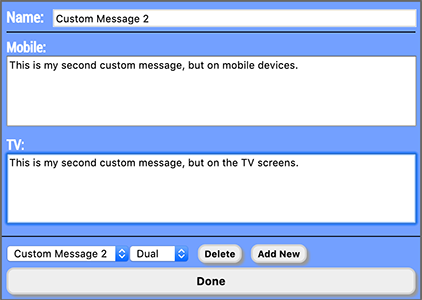
The second type of custom message is Dual. This is two flat text inputs that you can enter message into, and it will display the first message on the audience members' mobile devices, and the second one on the TVs. This is for when you want to present the same idea, but maybe phrase it differently depending on where it is displayed.
Hi-Impact Media Messages
Note: The following two types of custom messages require Hi-Impact Media permissions. Make sure to boost your show or upgrade your account if you want to use them!

The third type of custom message is Image. Here you can select an image graphic (jpg, png, gif, etc.) and it will appear on the audience member's mobile devices as well as on the televisions when the custom message is activated.

The fourth, and final, type of custom message is Video. Here you can paste in a YouTube link and the video will be played on all the TVs when the custom message is activated. The mobile devices will display a message telling them to look at the TVs in the venue.
If you are cycling custom messages, you must specify the length of the video so that transitioning between messages is smooth. Even if the video is longer, or shorter, than the length specified, the messages will cycle on the exact interval specified here.
Reorder Messages
Once you have more than 1 custom message defined, the button will appear. Click that button to be taken to the following screen:
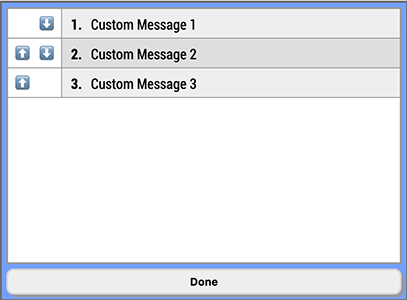
From here you can click the ⬆ and ⬇ buttons to move custom messages up and down in the order that they will appear in your dropdown on the Show Runner Interface. The order of your custom messages will also control the order they appear when cycling, so if you intend to use the message cycle feature then be sure to define your order and video lengths carefully!
Delete Show
If you want to delete your show, simply click the Delete button in the bottom right of the popup, as shown in the following screenshot:

You will be presented with a confirmation popup asking if you are sure you want to delete the show. Click 'OK' and the show will be deleted and you should no longer see it anywhere in your show list.
NOTE: THIS ACTION IS PERMANENT. IF YOU DELETE A SHOW THERE IS NO WAY TO GET IT BACK!
Copy Show
If you want to create a show that is a near copy of an existing show, you can click the button in the top right of the popup, as shown in the following screenshot:

When you copy a show the first thing you will be asked is which features you want to include in the new show, just like when you are creating a new show. The difference is all the features that were on the show being copied will be automatically selected, like you can see in the following screenshot. You have the option of turning off any previous features, or adding any new ones, at this time:

After you have selected the features you want on your new show copy, you will be taken to the Add Show parameters screen, but some values will be copied over from the previous show, as seen in the following screenshot:
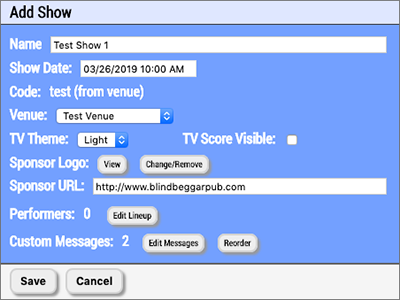
The name, code, venue, TV Theme, TV Score Visible, Sponsor Logo, Sponsor URL, and custom messages will all be copied to the new show. The show date, and performers will not be so you will have to fill those in for the new show. Once you have set up your new copied show the way you want, click the button like you would for a brand new show and it will be saved.
Boost Show
If you find that you require a higher audience capacity for your show, or you would like to add Hi-Impact Media and/or Advertising privileges, then you can click the button in the top right to add additional permissions to just this one show, as shown in the following screenshot:
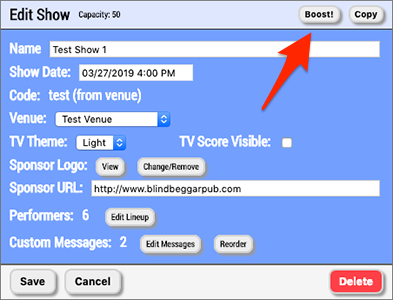
For more information on Show Boosting, Click Here. Note: If you want to boost ALL your existing shows, and any shows you create in the future, then be sure to Upgrade your Account.